Spring Boot
Vue.js ,Springboot 로 구현하는 다중 파일 업로드 심화
LuxuryCoding
2021. 5. 4. 21:08
728x90
두달 전에 파일 업로드 부분에 대해서 간단하게 구현을 했었는데 이번에는 조금 더 발전한 코드와 쇼핑몰 프로젝트에서 CRUD 중 C 부분에 대해서 정리하는 시간을 가지려고 해요. 쇼핑몰 프로젝트를 진행하면서 상품을 생성하는데에 있어서 Image 업로드 부분이 많이 오래 걸렸었던거 같아요ㅠㅠ 처음에는 멍청하게 Java collection을 사용하지 않고 이미지갯수를 딱 지정해놓고 imageurl1 ,imageurl2, imageurl3, 이런식으로 작성했었는데 조금 더 클린코드 조금 더 좋은 코드를 위해서 코드의 질을 높였달까? 글이 좀 긴 점 이해바랍니다!!
SpringBoot 프로젝트 구조
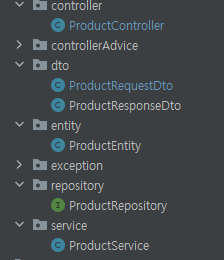
Controller
    @PostMapping
    public ResponseEntity<Long> registerProduct(@RequestBody @Valid ProductRequestDto productDto) {
        ProductResponseDto savedProduct = productService.save(productDto);
        return ResponseEntity.created(URI.create("/")).body(savedProduct.getId());
    }
    @PostMapping("/file")
    public ResponseEntity uploadImage(@RequestBody List<MultipartFile> files){
        if (files != null) {
            productService.uploadFiles(files);
        }
        return ResponseEntity.ok("이미지 저장완료");
    }
Cotroller 부분에서 api를 두 부분으로 나누었어요 registerProduct에서는 상품객체를 검증하고 Text 값들을 저장하기위해서 작성했구
- @RequestBody @Valid 어노테이션을 통해 자바객체로 변환하고 프론트에서 가져온 데이터를 검증하기위해 작성
uplaodImage 부분에서는 프로젝트 내에 프론트에서 가져온 이미지만 저장하기 위해서 API 를 분리 했어요.
RequestDto
public class ProductRequestDto {
    @NotBlank(message = "상품명이 없습니다")
    private String productName;
    @NotBlank(message = "상품 설명이 없습니다")
    private String productContent;
    @PositiveOrZero(message = "숫자를 정확히 입력해주세요 ex) 500")
    private Integer productPrice;
    @NotBlank(message = "카테고리가 없습니다.")
    private String productCategory;
    private List<String> productImageurl;

    public ProductEntity toProductEntity() {
        ProductEntity productEntity = ProductEntity.builder()
                .productName(productName)
                .productContent(productContent)
                .productPrice(productPrice)
                .productCategory(productCategory)
                .productImageurl(productImageurl)
                .build();
        return productEntity;
    }
}
- NotBlanck : 문자열 검증
- PositiveZero : 양수 검증
- 'toProductEntity()' : RequestDto를 Entity롤 변환 해주는 method
- 이미지가 20장 일수도 한장일수도 있으닌깐 collection 사용 첨엔 imageurl1,imageurl2 .... 이런식으로 멍청하게 했지만 고쳤습니다!!
Entity
@Getter
@Builder
@Entity
@NoArgsConstructor(access = AccessLevel.PROTECTED)
@AllArgsConstructor
@Table(name = "product")
public class ProductEntity  {
    @Id
    @GeneratedValue(strategy = GenerationType.IDENTITY)
    private Long id;
    @NotNull
    private String productName;
    @NotNull
    private String productContent;
    @NotNull
    private Integer productPrice;
    @NotNull
    private String productCategory;
    @NotNull
    @ElementCollection(fetch = FetchType.LAZY)
    @CollectionTable(name = "product_imageurl" ,joinColumns = @JoinColumn(name = "product_id"))
    private List<String> productImageurl;

    @Builder
    public ProductEntity(String productName, String productContent, Integer productPrice, String productCategory, List<String> productImageurl) {
        this.productName = productName;
        this.productContent = productContent;
        this.productPrice = productPrice;
        this.productCategory = productCategory;
        this.productImageurl = productImageurl;
    }
}
- ElementCollection 사용
`@ElementCollection(fetch = FetchType.LAZY) @CollectionTable(name = "product_imageurl" ,joinColumns = @JoinColumn(name = "product_id")) private List<String> productImageurl;
이코드를 보면 JPA @Entity의 @OneToMany 랑 유사하게 느껴지실수도 있어요 차이점을 요약하자면
- 부모 엔티티 즉 ProductEntity 하나에만 연관되어 관리됩니다. product_id 가 1 이라면 id가 1에 해당하는 상품에 여러이미지가 저장된다는 느낌이에요~
- 항상 부모와 함께 저장되고 삭제되므로 Cascade 옵션이 필요 없겠죠?
- 만약 image를 업데이트 하게되면? 기본적으로 @ElementCollection 에서는 식별자 개념이 없어서 바로 삭제 추가가 가능!!
- join table join colum을 id로 연관 관계를 맺을 수 있습니다.
ResposnDto
@Getter
@AllArgsConstructor
public class ProductResponseDto {
    private Long id;
    private String productName;
    private String productContent;
    private Integer productPrice;
    private String productCategory;
    private List<String> productImageurl;

    public static ProductResponseDto from(ProductEntity productEntity) {
        return new ProductResponseDto(productEntity.getId(), productEntity.getProductName(), productEntity.getProductContent(),
                productEntity.getProductPrice(), productEntity.getProductCategory(), productEntity.getProductImageurl());
    }
}
- ReponseDto 부분은 static factory method 를 사용했는데 추후에 글을 작성하려구요
저는 Springboot 프로젝트를 진행할때는 RequestDto -> Entity -> ResposnDto 로 클래스를 설계합니다
- 간단하게 DTO 왜 나눠?
- DB 설계와 동일한 객체를 화면에 공개하면 안되닌깐
- 응답 객체를 받는다면 항상 엔티티와 동일하지 않을 수도 있으닌깐
- 순환참조 문제(이건 다른 글도 좀 참조 했어요~)
- 따라서 View Layer 와 DB Layer의 역할 분리
Service
    @Transactional
    public ProductResponseDto save(ProductRequestDto productDto) {
        ProductEntity product = productDto.toProductEntity();
        return ProductResponseDto.from(productRepository.save(product));
    }

    public void uploadFiles(List<MultipartFile> files) {
        String baseDir = System.getProperty("user.dir") + "\\src\\frontend\\src\\assets\\images\\";
        if (files != null) {
            try {
                for (MultipartFile file : files) {
                    file.transferTo(new File(baseDir + file.getOriginalFilename()));
                }
            } catch (IllegalStateException | IOException e) {
                e.printStackTrace();
            }
        }
}- Controller 부분에서도 api 를 두 부분으로 나누었다고 했는데 Service 단에서도 상품 객체를 저장하는 API 이미지 파일을 저장하는 API 를 만들었습니다.
- uploadFiles() 메소드를 설명하자면 파일 리스트를 매개변수로 받게 되어 저장하게 됩니다.
- 어디에 저장할건데? 이건 정말 너무 많은 시행착오 끝에 알게 되었는데 System Class 에서 제공하는 getProperty 메소드와 키값을 ("user.dir") 을 작성해주면 해당 프로젝트에 루트로 이동합니다 만약 쇼핑몰 프로젝트를 생성했다면 해당 프로젝트 파일로 이동해요 그래서 저는 이미지를 프론트에 저장할꺼라서 System.getProperty("user.dir") + "\src\frontend\src\assets\images\"; 이런 식으로 프론트에 저장해주는 코드를 작성했습니다.
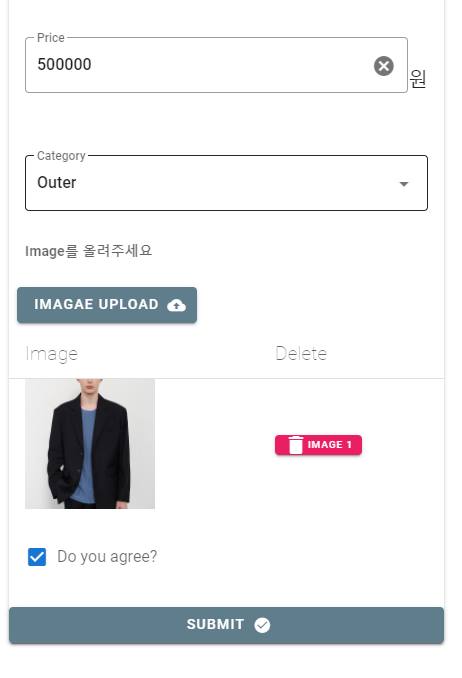
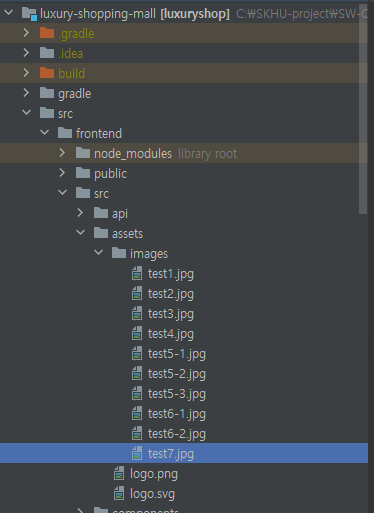
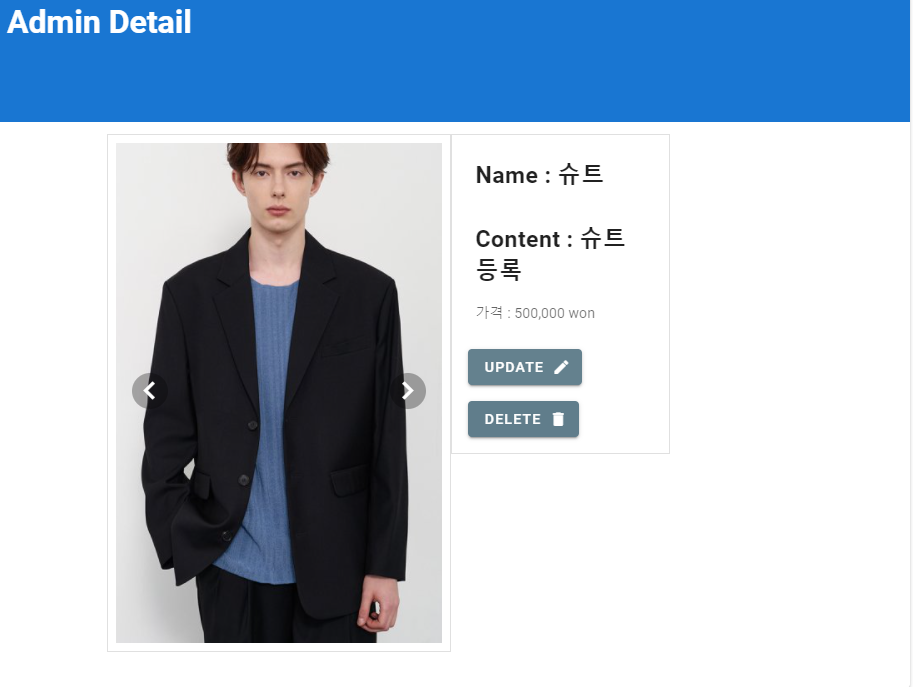
잘 저장되고 깔끔하게 잘 나오네요 front code 까지 정리하면 글이 너무 길어져 git 주소 첨부해요~
front 기능
- image 미리보기
- image 체크 삭제
- 유효성 검사
- axios.post 를 통해 back-end 통신